
Audio QR codes, tours and resource libraries: a practical setup guide
Choose an audio playlist, numbered tour or searchable collection; configure tracks and transcripts, publish safely and test the printed code.
Dernière publication
Dans cet article
- Choose a page structure before making the code
- Make an audio QR code with a readable transcript
- MP3 or PCM WAV: practical differences
- Turn separate recordings into a self-guided tour
- Use a searchable resource library for mixed materials
- Portfolio and teaching pages use the same publication discipline
- Publish, test and keep the printed code useful
A printed QR code can do more than open a homepage. At an exhibit, it can deliver a spoken explanation. On a product insert, it can bring instructions, a demonstration and a warranty document together. On a classroom handout, it can keep a lesson beside the resources students need.
The useful decision is what a visitor should receive after scanning. QRCodeTransfer now has distinct editors for an audio guide, an ordered tour, a searchable resource library, a portfolio and teaching materials. This guide shows how to choose and configure them, what stays editable after printing, and which checks to make before a public launch.
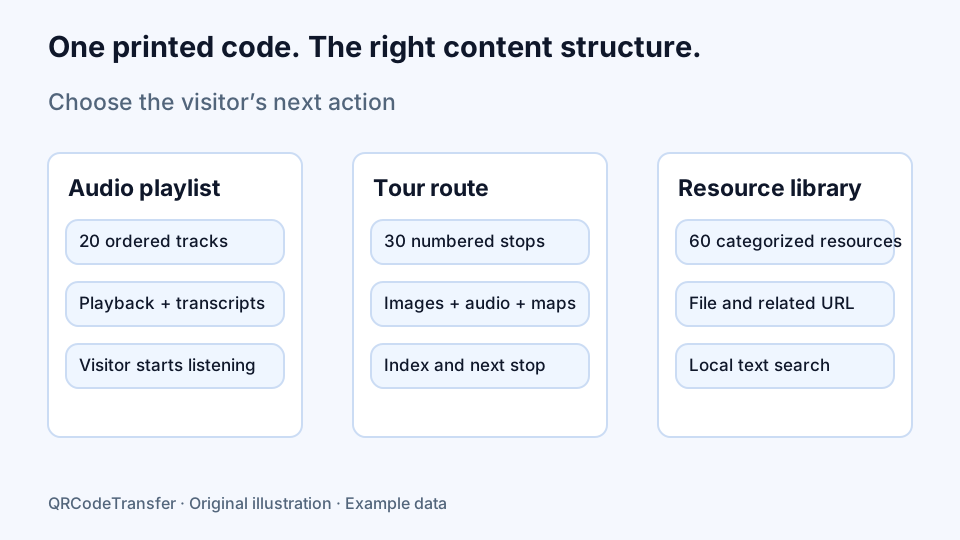
Choose a page structure before making the code
Start with the setting and the information the audience needs. Several file links in a paragraph can technically work, but a dedicated structure makes the relationship between items easier to understand on a phone.
| Page type | Best starting point | What the visitor receives | Current maximum |
|---|---|---|---|
| Audio guide | A spoken explanation, language recording or demonstration | Ordered tracks, independent controls and optional transcripts | 20 tracks |
| Tour guide | A venue, exhibition or self-guided route | A numbered stop index, explanations, optional images and audio, map and next-stop links | 30 stops |
| Resource library | Manuals, care instructions and reference links | Named categories, text search and resource actions | 60 resources |
| Portfolio | Work samples and completed projects | A responsive project grid with descriptions, images and related links | 30 projects |
| Teaching materials | Lesson instructions with supporting resources | Numbered lessons, categories and search | 60 lessons |
These specialist pages use the ordinary published-page allowance on Pro and above. They do not consume a separate audio-page allowance. Each uploaded file retains the existing 20 MB limit. Check the current plan comparison before preparing a large collection.
Make an audio QR code with a readable transcript
Open the audio guide solution and choose its creation action. Select the intended workspace and scan domain, then enter an internal name and a public page title. The internal name helps your team identify the asset; the public title tells a visitor what they have opened.
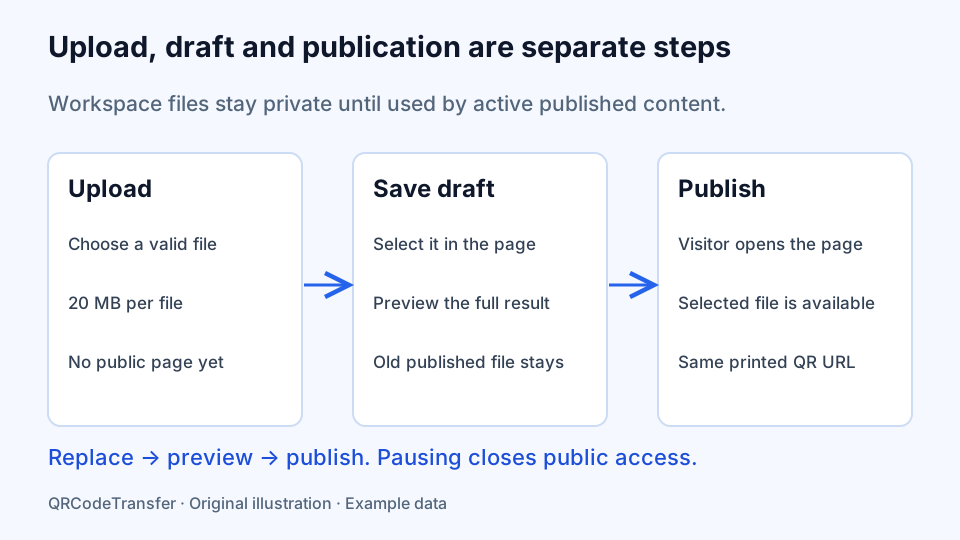
Upload an MP3 or PCM WAV recording through the file control. The service inspects the content rather than trusting the file extension. A renamed text file is not an audio upload. Files are stored through the normal workspace storage path, and an upload by itself does not publish the recording.
- Add a track. Enter a short title and select the uploaded audio file. A useful title identifies the subject or language, such as “Introduction to the west gallery”, rather than “recording-final-2”.
- Write a description. Tell people what they will hear and give any essential safety or route instruction in text as well.
- Add a transcript. Include the relevant spoken information for visitors who cannot listen or prefer to read. Check names and important instructions against the recording.
- Choose the playback window. Enter the start and end in seconds. An end value of zero uses the remaining original duration. For example, start 10 and end 30 plays the selected twenty-second window.
- Choose loop and download presentation. A loop can help with a repeated demonstration. A download button gives a visible link to the original recording. Visitors initiate playback themselves.
- Review the order. Move tracks up or down before saving the draft, then check the full viewing page.
A playback window changes player behavior; it does not export a physically shortened recording. The full file remains the source. If only a fragment may be published, create and upload an appropriately edited original first. Hiding the download button also does not turn streamed media into copy-protected content.
MP3 or PCM WAV: practical differences
MP3 is usually the practical choice for spoken guides when download size matters. PCM WAV preserves uncompressed samples and can be useful when an original production file is already available, but it may reach the upload limit much sooner.
A file format and its actual encoding are separate concerns. Playback also depends on the visitor’s browser and device. QRCodeTransfer does not transcode every recording into multiple alternative formats. Test the real uploaded file on the devices your audience uses; see the MDN media-format guide for background on containers and encoding support.
For a quiet gallery, headphones and a transcript can be more useful than a loud autoplay experience. For a workplace instruction, make the key written steps readable without requiring sound. The recording should complement the explanation, especially where a missed instruction could matter.
Turn separate recordings into a self-guided tour
Use the tour guide editor when location and order are important. Add the stops in walking order. Each stop has its own title and description, an optional image, an optional audio file and transcript, and a map URL.
The published page builds an index from the saved order. Visitors can jump to a numbered stop, follow Next stop, or return to another section. The page does not collect a visitor location or automatically mark a stop as visited. A map link opens the chosen map provider, which handles its own navigation and privacy settings.
For a reception sign, one code can introduce the complete route. For an exhibit label, a separate destination link can point to the published page with the relevant section anchor. Check the actual public address and anchor before printing the exhibit-specific code; do not assume that the current order will remain unchanged when you later rearrange stops.
Use a searchable resource library for mixed materials
An organized resource library is a better starting point when visitors need to find a document rather than follow a route. Give each item a title, category and explanation, then choose a workspace file, a related HTTP or HTTPS URL, or both.
A product support collection might use Installation, Operation and Warranty categories. “Installation guide — model A, revision 3” tells a customer more than a generic “Download” label. Explain which product or version each resource applies to so the category filter does not create false confidence that every document is suitable.
The published page offers category buttons and text search across the saved titles and descriptions. Search runs in the browser; its words are not sent to a separate search service. File actions open through the platform file address, while related URLs open the destination you selected.
This is a public collection, not a confidential document-management system. It does not provide per-visitor document permissions, formal document approval or offline synchronization. Remove material that should not be available to someone who obtains the public page link.
Portfolio and teaching pages use the same publication discipline
A portfolio presents up to thirty projects in a responsive grid. Explain the brief, your role and a result you can substantiate, then choose a representative image and optional project URL. On narrow screens the grid becomes one column so the description stays beside its work sample.
Teaching materials keep instructions beside their files and links. Numbered lessons, categories and search help students find the right task. State the learning objective, preparation, steps and expected output rather than making the resource file carry all the context.
Reading a public teaching page does not establish attendance or a completed assessment. When those records are needed, link the account-based training workflow or an appropriate form and verify the learner’s submission separately. A useful content page and a recorded business action serve different purposes.
Publish, test and keep the printed code useful
- Save the draft. Check the page title, selected files, links, track or lesson order and the intended page language.
- Publish the reviewed version. Only files referenced by eligible active published content become available through the public file route. Workspace editing and draft access remain protected.
- Open the public link as a visitor. Test playback, transcripts, stop navigation, category filtering and external-link access without relying on your editing account.
- Export at the physical size. Use a relevant print template, preserve the code’s clear margin and check dimensions with the QR print-size checker.
- Scan an actual sample. Test the surface, lighting, viewing distance and phones that will be used in practice before printing a batch.
Later updates follow the same draft-and-publish process. Uploading a replacement recording or manual does not immediately change the public version. Select it in the page, preview and publish. The saved scan identity remains fixed, including its domain choice, so existing printed material can continue to open the maintained page.
Publication status and plan eligibility still matter. Paused or unavailable content does not continue exposing its files as if it were active. Review the page and its quota when changing a subscription, and keep copies of original recordings and source documents for maintenance.
Prêt à créer votre code ?
Essayez le générateur ou inscrivez-vous pour gérer des codes dynamiques.
Créer un QR code